

This is a photo SOOC (Straight Out Of Camera). I can't remember who had snagged the camera from me on this day and taken this - it was either my oldest daughter or my hubby. Either way, I thought it was cute scrapbook material. I have to have something to blackmail my children with later in life. Right?
I rarely use a photo SOOC because it doesn't take much adjustment in Photoshop to make a good photo even better. I am not going to take the time here to go over everything I like to do to a photo. What I wanted to touch upon today was how to colorize a photo. I decided to use a playful set of elements on a blue background to create this layout. (Credits for this page can be found here. )

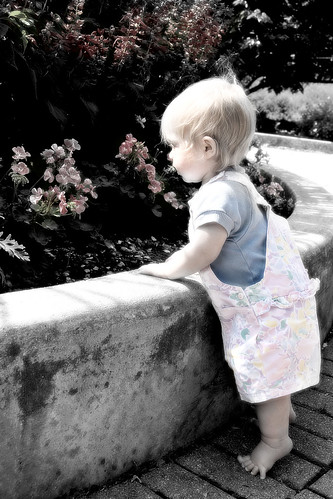
I thought that a color version of the photo wouldn't blend as well with this page, so I decided to convert it to a black and white photo with a slight blue tint.
Like this:

This is pretty easy to do. I will show how I did it in Photoshop CS, but I am sure that something similar can be done in many photo editing programs.

The first thing you do find the half black half white circle at the bottom of your Layers palette in Photoshop. This will bring up a list of adjustment layers that you can create. Click "Hue/Saturation." If you aren't familiar with adjustment layers, you should be. They allow you the freedom to change your photo in a way that is 100% editable later. If you change your mind, you can tweak or even throw away the adjustment layer and your original photo is still intact. An adjustment layer adjusts all the layers that are below it.
When I clicked on "Hue/Saturation," a new adjustment layer was created with its own layer mask. We'll talk more about that in a minute. A new Hue/Saturation window also opened which is visible in the screenshot above. In this I clicked the "colorize" button and made adjustments to both the Hue and Saturation sliders. The Saturation is moved to the left which removes color from (desaturates) the photo. If I moved this all the way to the left (0), I would have a grayscale-looking black and white. I left it at 9. The Hue slider adjusts what color tone is applied to the photo. I am using a blue-ish tone, but with this slider you can pick any color of the rainbow. When you are pleased with your results click "OK." If you want to adjust this later, just double-click the layer icon and this window will open again.
Now I took this a step further. I really liked the dark red stripes on my son's shirt and wanted to see them in the finished photo. I clicked on the layer mask in the Hue/Saturation adjustment layer to work on it. Layer masks are great tools. The mask is created solid white. Anywhere you paint black on this mask you will block out the current layer. I selected my brush tool. Using a small round brush and painting in black, I drew on the photo where I wanted to block out the colorized effects of the adjustment layer, allowing the colors from the layer below to show through.
This is a useful trick if you want to "tint" the eyes and cheeks of a face in a black and white photo. By using a brush on the layer mask, you can effectively "tint" a black and white photo with its original color.
This is also the technique I used on this photo. I used a black brush set to low opacity and lightly painted on several areas of the photo to bring out these pretty colors.
Give this technique a try. It is really fun and easy to do. And if you have any questions, leave a comment.
No comments:
Post a Comment